Brooder Guard or Area
Photo © Lauren Ware

A brooder area
is, simply put, a draft-free place where you will keep your chicks.
Feed and farm supply stores sell large, oval galvanized tubs for this
purpose, and you can buy specialized brooders complete with heat, but a
brooder can also be made of cardboard, a plastic tub, a kiddie pool, or
anything else you can dream up. Cardboard bins from your local vegetable/fruit store work amazing as well.
One caution: chicks have a habit of finding any little crevice or opening in the brooder and getting out. You'd think they could find their way back in, but when they're very young, they can't. You'll hear the loud cheeps of a lost chick anytime one gets out, but if they can't get back in, they can eventually die of stress, starvation, or thirst.
Brooder size: 2 square feet of space per chick.
Brooder Heat Lamp

Unless you have a complete brooder, you'll need a 250-watt heat lamp to keep the chicks warm. The area under the lamps should be 95 degrees F the first week, decreasing by 5 degrees per week until the chicks are fully feathered out (about 6 weeks of age) and/or you've reached the ambient temperature outdoors at night.
Have a backup, too. Chicks will die if they get too cold, so a spare light bulb will help ensure they never freeze to death. The light bulb needs to be housed in a proper lamp housing with a metal guard to prevent it from catching the bedding on fire if it should fall. Making sure it's height-adjustable is helpful, too.
One 250-watt heat lamp will warm 75 chicks at 50 degrees F ambient temperature.
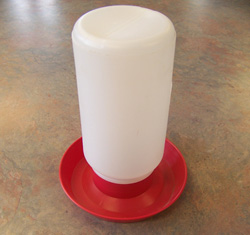
Chick Waterer's
I
like to use little giant waterers' for chicks for the first week or two.
You'll find as they grow, you'll refill it more and more often. I use three per 25 chicks and refill every 2
or 3 days. Or as needed.
Once they're a bit bigger, they can handle a gallon waterer or more. After about two weeks, I just move to a 5-gallon waterer like I use for my grown layers.
Set the waterers up out of the shavings on a piece of wood/brick or other makeshift stand as they grow, or you'll be picking shavings out of the water several times a day.
Chick Feeders
Photo © Lauren Ware

It's worth investing in special chick-sized feeders. I like the feeders with holes that they peck through for the first week or two, like the ones shown in the photo. You'll save enough money in wasted feed with the chick feeders that it will pay for their cost. They're designed so that the chicks can't get into and poop in the feed or tip it over. Allow free access to feed at all times.
The very first day, I spread some feed on a piece of cardboard and tap it. They immediately find the feed and the sound of beaks tapping on cardboard leads other chicks to the sound.
After about a week or two, I move to a tube-style feeder. Leave the chick feeders and new feeder out together for a day or so, to make sure they find the new food.
Bedding
Baby chicks need bedding just like older hens. Pine shavings are best as straw or hay are the wrong scale for them. They will get lost! Others start chicks on newspaper covered with hardware cloth. Never start chicks on newspaper alone, because it's too slippery. They can develop a condition called spraddle legs from being started on newspaper.
Feed
Use a high-quality feed, usually called "chick starter." Different brands of feed will have you transition to grower at different ages - some at 6 weeks of age and some as late as 6 months of age. Follow the recommendations of your feed manufacturer.
Medicated or not? It's up to you. If you have your chicks vaccinated for coccidiosis at the hatchery, do not feed medicated feed. If they're unvaccinated, you might want to provide them with medicated feed for extra protection.
Supplements
Here are some of the "extras":
- Gro Gel Plus: a gel that you feed to new hatchlings. Helps them find the feed and gets them off to a good start. Not necessary, but nice.
- Quik Chik (or another brand): a vitamin and electrolyte powder you use in their water.
- Diatomaceous earth: use food-grade only. Can be sprinkled in their feed to deter diseases, and when they're older you can sprinkle it in the coop (wear a respirator!) to kill mites.
- Grit: after the first week, if the birds have any access to bugs or worms, make sure they also have a source of grit, which helps them digest "real" food. Just some sand or dirt is fine, or you can buy grit at a feed or farm store.